Securing Production Pipelines in Azure with Workload Identity Federation + OIDC
The best secret is the one you never had to create

Background
Throughout my career advising and implementing cloud infrastructure for clients, few topics generate as much operational anxiety as secret management.
I have worked with numerous organizations struggling to maintain visibility and security over long-lived credentials across disparate environments (Development, UAT, Production). The operational burden is immense: How do you secure these keys? How do you take accurate inventory? And perhaps most dreadfully, how do you handle rotation?
The desperation to solve the rotation problem often leads teams down a dangerous path: writing custom functions and complex scripts solely to automate secret rotation. While well-intentioned, this approach introduces a new layer of technical debt; custom code that must now be maintained, debugged, and secured, often requiring a "master secret" itself (the infamous "Secret Zero" problem).
There is a better way. Instead of building better mousetraps for managing static secrets, modern cloud architecture allows us to eliminate them entirely.
In this article, I'll show how to move beyond static Service Principal secrets by implementing a secret-less production-ready deployment pipeline for Terraform and application deployment to Azure using Workload Identity Federation and OpenID Connect (OIDC).
N.B: I will be using GitHub Actions for my workflows, however, this is also supported for Azure Pipelines, GitLab CI, Jenkins, etc.
The Problem with Long-Lived Credentials (Service Principal with a Client Secret)
Traditional CI/CD authentication relies on Service Principals with Client Secrets; essentially a username and a long-lived password. While common, this "static" approach creates three critical bottlenecks for production-ready pipelines:
1. The "Ticking Time Bomb" (Expiration)
Every client secret has an expiration date. In a busy production environment, these dates are often forgotten until a mission-critical deployment fails on a Friday afternoon. This leads to:
Manual Toil: Engineers must manually generate, share, and update secrets across GitHub or Azure.
Pipeline Downtime: Business-critical updates are blocked by authentication failures.
2. The "Secret Zero" Security Risk
Because secrets are static, they must be stored somewhere (GitHub Secrets, Key Vault, etc.). This creates a permanent attack surface:
Credential Exposure: If a secret is accidentally logged, committed, or leaked, it remains valid until manually revoked.
Lateral Movement: Since these secrets are often over-privileged to "just make it work," a single leak can give an attacker broad access to your entire Azure tenant.
3. The Automation Tax
To solve the rotation problem, many teams write custom functions or logic apps to rotate secrets automatically. This introduces Management Debt: you are now writing and maintaining code just to manage your security credentials.
The Bottom Line: Using static secrets means you aren't managing security; you're managing a list of passwords that are waiting to break or be stolen.
The Solution: Workload Identity Federation (OIDC)
Workload Identity Federation (WIF) allows services withing and outside of Azure to access Azure Entra ID protected resources without exposing any secrets or needing to manage one.
Azure uses a concept of application registration which can enable you to represent a vast majority of modern workloads and platforms as an "application". Things like;
GitHub ActionsWorkloads on any Kubernetes cluster (AKS, EKS, GKE)Workloads running on Azure compute platforms using app identitiesWorkloads running in Amazon Web Services (AWS)Service connection in Azure PipelinesGoogle CloudOn-Premises Workloads etc.
However, instead of creating an accompanying secret credential, you now create a federated credential with an OpenID Connect (OIDC) identity provider, such as GitHub, Google, Microsoft, AWS, etc.
How Workload Identity Federation Works
When you create an application registration in Azure, you allow other identities to impersonate this application by establishing a trust with an external OIDC identity provider. This federation allows you to get tokens to access Microsoft Entra ID protected resources that this application has access to like Azure and Microsoft Graph.

To explain Workload Identity Federation using the conference analogy, imagine you are attending a high-security Tech Summit in Nigeria (Azure).
The Old Way: The Physical Key (Client Secret)
The organizers mail you a physical master key to the building. You have to keep it in your pocket. If you lose it, anyone who finds it can enter. If you forget it at home, you’re locked out. The organizers have to change the locks every 90 days to stay safe.
The New Way: The Federated Badge (OIDC)
Instead of a key, the organizers (Azure/Entra ID) set up a Trust Agreement with your Employer; in our case (GitHub).
The Proof (The OIDC Token): You arrive at the conference. You don't have a key; instead, you show your Digital Employee ID Card issued by your company. This card is signed by your boss and proves exactly who you are and which project you work on.
The Verification (Federated Credential): The Security Desk (Entra ID) doesn't know you personally, but they have a Guest List that says: "We trust IDs issued by GitHub Corp, as long as the person is from the 'Payment-API' repository."
The Exchange (Token Exchange): Security checks the signature on your Employee ID. Since it matches their trust list, they take your ID and hand you a Temporary Conference Badge (Azure Access Token).
The Access (Scoped Permissions): This badge only opens the doors to the "Production Server" room.
The Expiry: As soon as you finish your session and leave the building, the badge becomes a worthless piece of plastic. You never had a "secret" to lose, and the organizers never have to change the locks.
Implementation: Let's Get Our Hands Dirty :)
With the concepts out of the way, now let's see how this works in a production-grade pipeline:
Prerequisites
Azure Subscription: an active subscription where you have permissions to create an Entra ID Application, a Service Principal, and assign roles (e.g., Owner or Contributor)
Azure CLI: required to assign roles to our service principal, make sure to run
az loginto sign in to your Azure subscription.GitHub Repository: a repository on GitHub where you can create workflows.
Terraform & Terraform CLI: if you wish to run the sample infrastructure code locally to demonstrate local setup first.
Step-by-Step Implementation
We'll use Azure CLI to create a repeatable configuration for everything needed in Azure and GitHub.
N:B: This is not an intro to Terraform, Azure and GitHub, I assume you have some experience working with these tools/services.
- Step 1: Setup environment variable
Open up a terminal and copy-paste the below block. If you're on Windows, you may want to use a tool like Git Bash or WSL to run this script, as it uses Unix-style commands and syntax. Also ensure to replace placeholder values with your own specific GitHub and Azure values.
# Replace these with your actual GitHub organization and repository name
GITHUB_ORG="YourGitHubOrg"
GITHUB_REPO="YourGitHubRepo"

# This will be the name of the Entra ID Application and Service Principal
ENTRA_ID_APP_NAME="azure-wif-oidc-terraform-app"

# --- Azure CLI commands ---
# You can leave these as is
AZURE_SUBSCRIPTION_ID=$(az account show --query id -o tsv)
AZURE_TENANT_ID=$(az account show --query tenantId -o tsv)
echo "Configuration completed"
echo "GitHub Org: $GITHUB_ORG"
echo "GitHub Repo: $GITHUB_REPO"
echo "Azure Subscription ID: $AZURE_SUBSCRIPTION_ID"
echo "Azure Tenant ID: $AZURE_TENANT_ID"
- Step 2: Create the Entra ID App and Service Principal
An Entra ID Application will serve as the identity for our GitHub workflow. The Service Principal is the instance of that application within your Azure tenant, which is what we will grant RBAC roles/permissions to.
# Create the Entra ID Application
APP_ID=\((az ad app create --display-name "\)ENTRA_ID_APP_NAME" --query appId -o tsv)

# It can take a few seconds for the app to propagate, so we add a short delay.
echo "Waiting for Entra ID application to propagate..."
sleep 3

# Create a Service Principal for the Entra ID Application
SP_OBJECT_ID=\((az ad sp create --id "\)APP_ID" --query id -o tsv)
# Add a check to ensure the Service Principal was created successfully
if [ -z "$SP_OBJECT_ID" ]; then
  echo "Error: Failed to create Service Principal. Please check your permissions in Azure Entra ID."
  exit 1
fi
echo "Entra ID Application and Service Principal created."
echo "Application (Client) ID: $APP_ID"
echo "Service Principal Object ID: $SP_OBJECT_ID"
- Step 3: Create an RBAC Role for The Service Principal
Our GitHub pipeline workflow would need to create resources in Azure using the identity we created earlier, we'll assign a Contributor RBAC role for this demo, however, for your specific environment, you may need to scope your identity's access to the least privilege on the Management group, Subscription, Resource group or Resource.
# Assign the 'Contributor' role to the Service Principal for the entire subscription
MSYS_NO_PATHCONV=1 az role assignment create --role "Contributor" --scope "/subscriptions/\(AZURE_SUBSCRIPTION_ID" --assignee "\)SP_OBJECT_ID"
- Step 4: Configure Trust Relationship Between The Federated Identity & GitHub
This is the crucial part of the OIDC connection. We are essentially telling our Azure Entra ID Application to trust identity tokens issued by GitHub, but only for workflows originating from our specific repository and the Production environment.
First, create a credential.json JSON file with the credential details. You can adjust the name, description and subject as needed.
# credential.json
{
    "name": "azure-oidc-federated-credential",
    "issuer": "https://token.actions.githubusercontent.com",
    "subject": "repo:ugwulo/azure-wif-oidc terraform:environment:Production",
    "description": "Production OIDC credential for GitHub Actions",
    "audiences": [
        "api://AzureADTokenExchange"
    ]
}
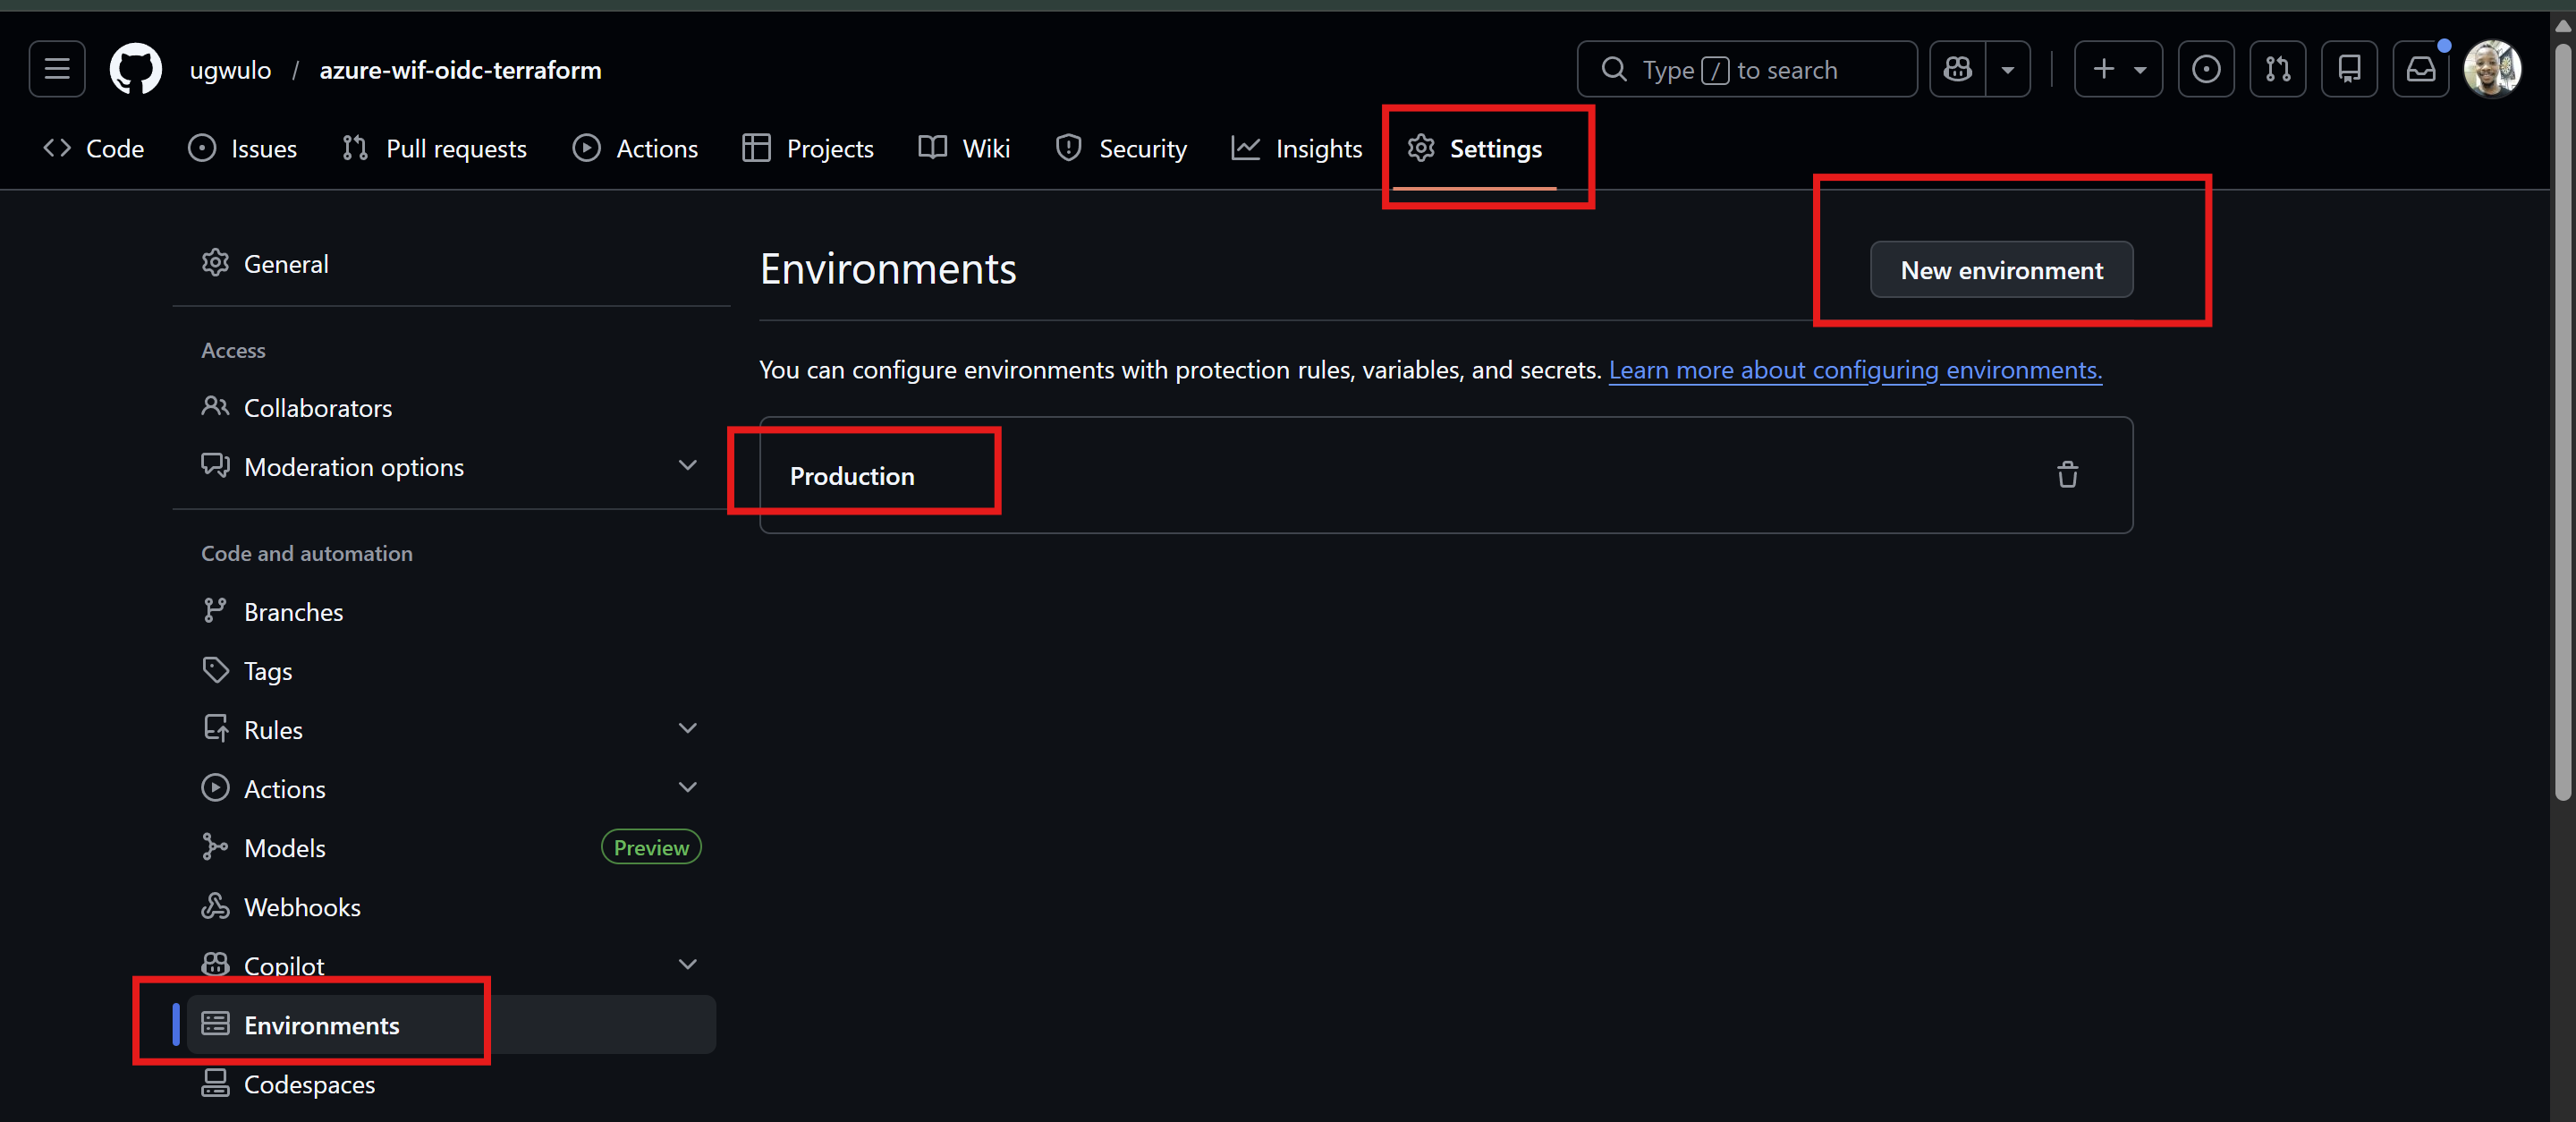
Ensure you create an environment in the GitHub repository you created for this; where all production deployments will be logically grouped. Environments in GitHub also allow you to add deployments gates for pipeline controls.
Proceed to run this trust command locally, make sure you're in the correct directory for credential.json file.
az ad app federated-credential create --id "$APP_ID" --parameters credential.json
For Jobs not tied to an environment, you can;
Include the ref path for branch/tag based on the ref path used for triggering the workflow:
repo:< Organization/Repository >:ref:< ref path>.In my case,repo:ugwulo/azure-wif-oidc-terraform:ref:refs/heads/main
For workflows triggered by a pull request event:repo:< Organization/Repository >:pull-request.In my case,repo:ugwulo/azure-wif-oidc-terraform:pull_request
- Step 5: Terraform Project Setup
We will proceed with setting up our repository and deploy the sample resources and application in Azure using Terraform.
Clone this repository: https://github.com/ugwulo/azure-wif-oidc-terraform
This repository contains Terraform modules that creates a resource group and App Service in Azure.
It is always recommended to use a remote backend for managing Terraform state files in production, review and run this script locally to create the storage container: create-storage.sh
In the cloned repository, you'll find a backend.tf file in the production directory, I have intentionally created empty development and uat directories if you wish to replicate on those environments.
Please ensure to update the resource group and storage account names to match your own configuration in the previous step. Also update the subscription ID and App service name in this file: appservicelinux-env.yaml to match your own as they must be unique across all Azure tenants. I should probably have made those dynamic :)

- Step 6: Configure the GitHub Actions Workflow
Lastly, review the workflow file at .github/workflows/oidc-production-iac-pipeline.yaml in your repository. This YAML defines the CI/CD pipeline.
N.B: Since we will not be using any secrets, it makes more sense to use GitHub variables instead of secrets.
The workflow above uses vars, which are considered best practice for non-sensitive identifiers. Go to your GitHub repository's Settings > Secrets and Variables > Actions
On that page, select the Variables tab and create the following Repository variables:
AZURE_CLIENT_ID: The APP_ID value from Step 2 above.
AZURE_TENANT_ID: Your Azure Tenant ID.
AZURE_SUBSCRIPTION_ID: Your Azure Subscription ID.
When you commit and push your changes to your repository, your workflow should run.
What Happens Behind The Scenes?
The azure/login action begins. Because of the permissions block, also notice that both Plan and Apply stages references Production environment we created in Step 4, this is required for the OIDC subject claim. "repo:ugwulo/azure-wif-oidc-terraform:environment:Production"
# other lines removed for brevity
permissions:
  id-token: write
  contents: read

jobs:
  terraform-plan:
    name: Terraform Plan
    runs-on: ubuntu-latest
    environment:
      name: Production
This permission block first requests a JWT (JSON Web Token) from GitHub's internal OIDC provider. GitHub generates a token containing claims about the workflow, such as the originating repository (my-org/my-repo) and the environment (:environment:production).
The action presents this JWT to Azure Entra ID. Azure Entra ID validates the token’s signature and inspects its claims. It sees that the subject claim matches the federated credential we configured in Step 4. Since the trust is validated, Azure Entra ID issues a standard, short-lived access token back to the workflow. All subsequent actions, like terraform apply, now use this access token to securely authenticate with Azure to provision your resources.
Terraform no longer requires a secret for authenticating the azurerm provider.

You can add pipeline gates by adding reviewers in the Production environment to request your approval before the pipeline can proceed to Plan and Apply your changes, this is crucial to every production workflow so you can properly review changes before deployment.

If everything checks out, you should see your provisioned resources in Azure, you can locate the deployed App Service and test the URL, you should see the sample NGINX web page.
Congratulations, you have successfully setup a secret-less pipeline deployment!

Housekeeping
Once you are done, it’s important to clean up the created resources. You can simply locate your newly created resource groups in Azure and delete them, also delete the created Entra ID App registration.
Conclusion
In conclusion, we have now fully automated a production pipeline without exposing any secrets or worrying about managing one. This pattern helps all stakeholders eliminate the operational overhead.
References:
https://openid.net/developers/how-connect-works/
Found this guide useful? please like, share with your team and I’d love to hear how you’re using these ideas too.
Let’s connect on LinkedIn to share more stories and build resilient infrastructures together.


